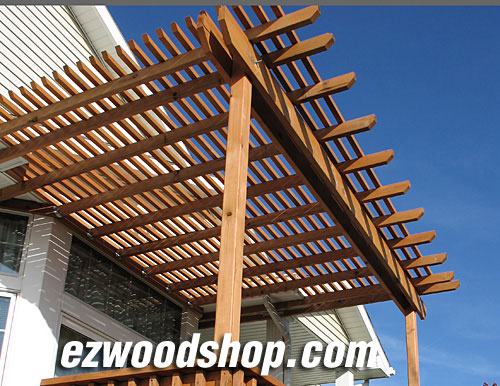
Attached Pergola Plans - How to BuildThe best way to cool off a hot deck is to add a pergola. This style of pergola plans attached to your house or deck uses rafters and slats to cut down sunlight, which can transform an otherwise uncomfortable deck into a nice place to spend time.
Get this Pergola Plan FREE-- with my FREE email newsletter
Just enter your current email address in the box above for immediate access. |
|
My favorite thing about this attached to house pergola plan is that you don't have to be a carpenter to build it. You won't need expensive tools or complicated joinery to learn how to bring all the pieces together. A circular saw, cordless drill, and jigsaw are enough to get the job done.
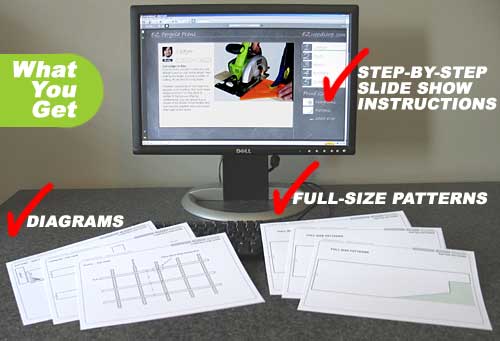
My downloadable plan features a step-by-step slide showing you exactly how I went about building this project. I've also included easy-to-follow cutting diagrams and illustrations that show you exactly how the joinery works (this means you can alter the design if you like to fit whatever space you have available). You'll also get full-size cutting patterns for creating decorative ends on the rafters.
Not what you're looking for? Here are some other pergola plans you might be interested in.
Pergola Plans - PlansNOW.comIf you can follow this pergola plan down to the last detail, you'll certainly have a well-made addition to your house. I'm all for focusing on small details, but I wonder if most builders of pergola plans might think this plan is a little over the top for what they're trying to accomplish.
For example, I'd imagine that most builders would simply mount the corner posts flush against the side of a house, and maybe caulk the gaps that the lap siding would leave exposed. However, in this pergoal plan, the designer suggests that you cut out notches along the posts so they'll have a flush fit against the lap siding. That means you'll have to first scribe the lap siding pattern on to each post and then figure out a way to cut the notches out.
PlansNOW's solution to this problem is to get out your circular saw and make alternating cuts - one deep, one shallow - to define the top and bottom edge of the notch (whew). Then get out a chisel and a handsaw to carefully remove the notched areas. Wow. That's a lot of work, but I suppose if you're inclined to build something with these kinds of fine details, this would be the way to do it. The fact of the matter is, this kind of joinery is probably better suited to something you would do in a woodworking shop using a router and maybe a drill press. But then this is supposed to be one of those outdoor projects that I suppose necessitates the use of outdoor tools. The beams are a little easier to get flush to the siding. That's because the 2x6s are thin enough that you can use a jig saw to cut the pattern.
The plan also calls for lap joints in the beams, which can be a little tricky because the a 4x4s are a fairly bulky piece of wood. You can do it though, using a circular to cut a series of passes across the end of the beam (about 25 or so), and then chipping away the scored wood with a chisel. More work.
At this point in the pergola plan, you could probably just fit everything together and be happy enough with a simple pergola with square-ended rafters. If that doesn't make you happy, then you can certainly continue on with the plan and make some more decorative-looking rafters. That means getting out more tools, though, like a router, to get some decent looking arches and patterns to show on the ends of the rafters.
Overall, this is a very nice design for a simple-looking pergola that's not so simple to build. If you're the type that likes a challenge, regardless of what you're trying to build, you'll like the tricks and turns in this plan. And of course, all this will make much more sense to you if you already have a woodworking background. For everyone else, this pergola plan still offers some good, basic know-how for approaching the task of building a pergola.
Pergola Plans - Wood MagazineIt may not be the easiest pergola plan you can find, but the Build-to-Suit pergola from Wood magazine is one of the most attractive I seen. The sweeping arches and notched joinery in the girders set this project plan apart from much of what you'll find on the Web. And though it's probably cheaper to use treated pine, Wood magazine's suggestion to use cedar is probably a good one - especially if want this project to last.
This particular structure takes up a space approximately 9 x 12. However, like most pergola plans, you can modify the dimensions to fit your own space. Also, you can build it as a freestanding pergola - or attach it to an existing deck or patio. The basic steps for construciton start with raising the posts, then constructing the frames, then fitting the slotted girders together. The mere size of the lumber can be a little intimidating, but the overall construction is fairly simple. Everything can pretty much be cut using a portable circular saw and a crosscut guide. You can finish off some of the boards with a simple handsaw.
If you're building on an exisiting deck, use the steel post brackets (from your local home center) that are designed just for this purpose. You'll be mounting the brackets directly to the floor of your deck - one for each corner post of the pergola. What's nice about the brackets is that you can fine tune the position of each corner post befor tightening things down, which you'll likely do a few times before getting the corners perfectly square. Note: this pergola plan suggests that you attach wood blocking underneath your deck - directly below the location of your posts - to help support the beams when they go up.
Once the brackets are where you want them, you'll need some help to stand the girder assemblies up in the post bases. Make sure they're plumb and then secure them in place. After that, you can screw the bases to the posts. The rest of the pergola plan assembly is primarily about attaching the rafters to the end girders. This can all be done with a simple power hand drill and a variety of deck screws.
Like most of the pergola plans from Wood magazine, the instructions and illustrations in this pergola plan are large and easy to read. I also like how the drawings are on their own separate pages, which means I can separate them from the rest of the plan and carry with me only the instructions I need for a particular step of the pergola project.
Pergola Plans - LowesThe thing I like most about these pergola plans is the simplicity. The plan shows that you can still have a very attractive structure without spending a lot of extra time and money for sweeping arches and decorative rafters. The square, blunt end of a 2x6 has a style all its own, and makes a perfectly fine rafter for most pergola designs.
I also like this plan include because of the different approach Lowes takes in mounting the 4x4 beams to an exisiting deck. Rather than use steel brackets mounted to the deck floor (like the Wood magazine pergola plan), Lowes suggests that you mount the beams to your underlying deck joists. This means you'll need to cut four different square holes in your deck floor to let the beams pass through. Then you'll attach the beams to the joists with carraige bolts.
At first I thought this approach might be more trouble than it's worth, considering that the steel post brackets are so convenient and easy to use. However, if your backyard gets hit occassionally with high winds (like a lot of yards do in new suburban housing developments) the extra support provided by your deck's floor joists could be exactly what you need to keep your pergola upright. Also, this might actually be easier to pull off than trying to mount an extra support board under the deck, as Wood suggests in their plan.
The tricky part in this mount-below-deck approach is making sure the four hole locations you lay out on your deck floor are perfectly square to each other (this is called the footprint). If they're not, your pergola won't be square, and none of boards from this point on will line up the way they need to line up. So you'll need to add a little extra care at this critical stage of the poject if you want everything to work.
Also keep in mind that your deck may not be perfectly square itself, so don't use the deck joists themselves to lay out all four corners of your pergola. However, do line up your first two posts along one joist in your deck. This will give you a snug fit for driving your first set of carraige bolts, as well as give you a starting point to lay out the position of the remaining two posts. You'll need to find a way to locate post #3 at a perfect 90 degree angle to that line. The 3-4-5 rule is a a handy builder's trick for quickly finding that 90 degree angle. The rule demonstrates that a triangle measuring 3 x 4 x 5 will always yield a 90 degree angle. Here's how to use the 3-4-5 rule to set up the position of post #3 and #4.
OverviewPergolas provide the ideal blend of shade and sunlight for outdoor decks and patios. Most plan designs are fairly simple to build, showing you how to use common hand tools and easy-to-find materials. If you build a pergola that attaches to the side of your house (above your deck) you'll avoid the some of the more daunting challenges that come with building a free-standing structure.
Pergolas date back to ancient Egypt, but their origins are more often associated with the early Renaissance gardens in Italy. Later their popularity spread to other parts of Europe, with pergolas showing up in gardens designed for the rich and noble classes. The pergola's function today is pretty much as it has always been - a structure designed to gently filter the heat of the sun and possibly provide something that plants can grow on (like grapes).
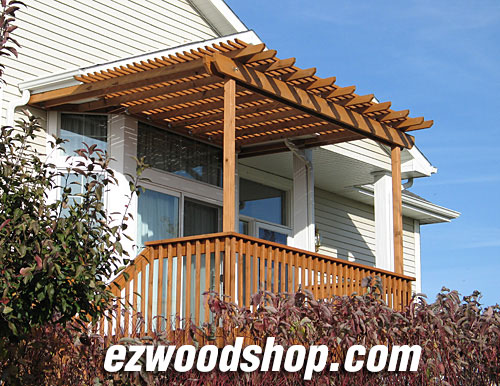
The architecture of a pergola can add a striking visual feature to your backyard - transforming a deck, garden, or back entrance to a home. A pergola's bold lines will play with the sun throughout the day, casting ever-changing shadows across your deck or patio. Another nice feature of a pergola is its trellis-like structure, wich is ideal for growing flowering vines - or any other type foliage that wouldn't normally want growing on the side of your house.
One of the first things to think about in building a pergola is whether the you'll attach it to your house, or build a free-standing structure. Both variations are reasonably easy to build for a DIY kind of person, but attaching it to your house will make the project much easier. If you prefer a free-standing pergola, you'll be facing a few more challenges in making the structure stand on its on, and that means more lumber, more hardware, and more planning.
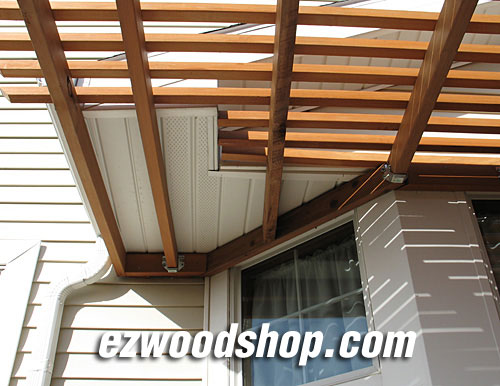
Most of the pergola plans I'm looking at here are designed to attach to the back or your house or deck. In this case, the important piece of lumber is, of course, the piece that secures the pergola to the house. In most plans, this piece of wood is called the "ledger" (defined as a horizontal board fastened to the vertical uprights of a scaffold). If you can manage to mount the ledger securely and squarely to the side of your house, you've got the bigger part of the job tackeled.
The rest of the attached pergola plans is all about how to cut the posts, rafters, and the beams that support the rafters. Aside from a few optional add-ons, that's pretty much the extent of the project. Although it's tempting to cut all the pieces first before you start building (like you're putting together a kit), most experienced carpenters will cut pieces as they go - measuring and cutting each board only as they need it for a particular section of the project. This can save you a lot of ruined lumber and wasted time. of course, there will be plenty of opportunity to economize some of your cutting tasks by ganging up like boards that all need the same treatment (like the pergola rafters).
|
|