EZ
Sawhorse Plans/Cutting Station
Before I started this project, my idea
of a sawhorse was something I remembered from
my dad's garage - an old beat up and wobbly
pair of crooked legs that had junk piled on
top of it. That's why I never bothered to
build a pair for myself. I guess I never saw
the point of having sawhorses in the shop,
taking up space with all the other worktables
I had collected.

This sawhorse plan changed my mind about all
that. What I discovered is that a sawhorse
can be one of most useful pieces of shop furniture
in my basement and garage. Sure, I could have
always bought a pair of plastic sawhorses
from Home Depot, but as you'll soon see, a
pair of sawhorses like these can do so much
more...and at less cost.
Cut Large Panels
Plywood is one of my favorite materials for building simple wood projects. Unfortunately, the large panels (4' x 8') can be difficult to work with. The panels usually end up on the floor, with you having to get down on your hands and knees to measure, mark, and cut them to size (not very fun).
The EZ Panel Cutter takes plywood off the floor—and puts it up within easy reach. It also provides a nice place to store plywood for an upcoming project—conveniently tucked away in a corner and away from concrete floors and walls (to avoid moisture damage).
More Reasons to Build a Sawhorse
Work From Any Angle
Working on most benches and shop
tables means that one side of my work piece
is always unreachable. A sawhorse solves this
problem with its open-frame - which lets me
work on all sides of my project at the same
time. I can even get down and underneath the
project and reach hard-to-get-to corners for
joinery and finishing.
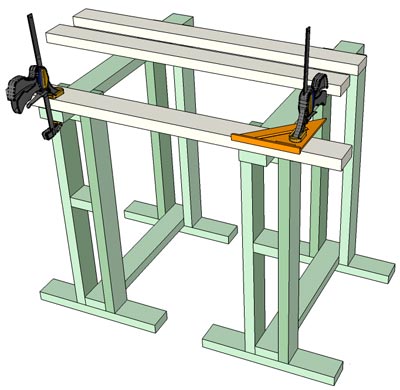
Perfect Clamping Station
I never seem to have enough places
to clamp a board. Workbenches and shop tables
are never the ideal place to clamp things
down, at least without installing some expensive
vises. This sawhorse plan solves my problem
by providing me an almost endless set of possibilities
for clamping boards.
Tips for Building a Sawhorse
The worst (and most likely) thing that can
go wrong when building a sawhorse is to end
up with something that wobbles. This problem
can always be traced back to a faulty leg
- either one leg that is shorter or longer
than the rest. A little extra
time and care in making the sawhorse legs
goes a long way in making the rest of the
project move ahead without a hitch.
I like to use the cut-as-you-go method
for most of the sawhorse project, which means
I measure, layout, and cut each piece one
at a time. However, you can use the first
leg as a template for those that follow. That's
one way to make sure all the legs are exactly
same without even having to measure.
|