
|
EZ Wood Joints - Make Woodworking Joints the Easy Way |
A pair of 2x4s nailed together at the ends may not be the most glamorous example woodworking joinery, but it's a wood joint none the less. In fact, any two pieces of wood attached to each other in some fashion can be called joinery. Sometimes the term itself implies a certain level of difficulty, but as you'll discover, that's not always true. In workbench plans, for example, the type of joinery used can vary from extremely simple to extremely difficult. |
 |
 |
 |
 |
|||||
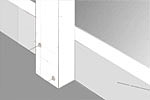
Butt JointsThe simplicity of a butt joint makes this a popular choice for projects. The joint can be somewhat deceiving, though, what goes into making this joint is often hidden. |
Lap JointsAbout the easiest and quickest way to bring two boards together is with a lap joint. Lap joints are a good choice for projects like workbenches, outdoor furniture, and utility-minded projects. |
Dado JointsIt doesn’t take long to exhaust all the possibilities for projects using simple butt joints and lap joints. When you reach that point in your woodworking, you’ll be ready to move on to dados. |
How to Build AnythingEasy, step-by-step instructions cover the basics of project construction in a way that woodworking plans don't. |
For example, full lap joints are often the best type of joinery to use for a project. They don't require expensive tools to cut, and with only a few screws and nails, you can create a structure that is strong and durable - strong enough for things like workbenches, shelves, and storage cabinets. On the other hand, if you're building something more refined - like dresser drawers - you'll probably be looking at rabbets, dadoes, and possibly dovetail joints. In the end, the kind of joinery you choose for a project ultimately depends on two considerations: strength and style. Strength is probably the more important factor, considering that a failed joint usually means a broken piece of furniture. However, you can easily end up creating joinery that is ten times stronger than it really needs to be for a given project. That means a lot of wasted time and unnecessary wear and tear on your power tools. So the best way to approach this is to decide what type of project you want to build and then pick a style of joinery best suited for that particular project. The only exception to this rule is in regard to the particular tools you own. If you're just getting started with woodworking, you'll soon discover that a certain type of joinery is very much tied to a certain type of shop tool. If you don't have the tool, you'll have to find an alternative method for cutting the joint. Sometimes this works fine, sometimes not. Hopefully the woodworking plans you find will offer suggestions for an appropriate type of joinery to use, and an alternative method if available.
A secondary consideration for choosing a joinery is simply the way the joint looks on a finished project. Obviously this is more important with fine furniture, but it can also make a big difference in structures as simple as a workbench or backyard pergola. If you'd like to show off some of your woodworking skills, joinery is the perfect place to showcase what you can do in the shop. Also, as a general rule, the more complex the joint, the stronger the overall construction will be. That's an added benefit, but it shouldn't be the only reason you take on more complicated joinery. A workbench can have some of the simplest - and most complex joinery of just about any woodworking project. That all depends on the details you want to include in your particular workbench plan. Starting with the easy approach, all we're really looking at is a way to connect four legs within some type of framework that will hold a table top...or some type of work surface that brings your work piece up to waist level. Of course, the type of work you do on that surface will dictate to some degree the type of joinery you'll want use. But for sake of example, let's assume you're a typical DIY project builder wanting a bench that will handle most small jobs around the house. No need for complicated joinery here. In fact, a simple workbench design using 2x4s and full lap joints will likely do the job. A full lap joint is just what it sounds like it is: one board overlapping another. It's the most simple joinery method you can use. In fact, you could probably drive nails through both boards and have still have a fairly sturdy bench after everything is attached together. Best part is that full lap joints don't require any cutting really...just line up the ends of boards you've already cut to size and nail them together. Not many workbench plans will suggest you build something this crude, but it's certainly possible to have a reasonably sturdy bench using nothing more than lap joints and nails. If you're determined to use nails (instead of screws), you might consider first laying down some glue between the two boards. The nails by themselves will eventually start to loosen up, and you'll have a workbench that wobbles like crazy. Another option for full lap joints is to skip the nails and use some heavy-duty lag screws or carriage bolts to hold everything together. This way you can go back and tighten everything down when things start to loosen up (as your workbench inevitably will). Table Saw DadosGetting clean dado cuts from your table saw and dado blade is not as easy as it might appear. More often than not, you'll discover that the dado blade has left a fairly ragged edge. |
|